
Reef Aquarium Auto Top-Off (ATO) Systems: 2026 Buyer's Guide
Your tank loses fresh water every hour of every day — and every drop that leaves makes the water saltier. An ATO is the small machine that quietly undoes that. Here's how it works, why cheap ones flood living rooms, and which one belongs on your tank.
Why Every Reef Tank Needs One
Every reef tank is slowly turning itself into a salt mine. Water evaporates around the clock — a typical open-top 90-gallon setup loses roughly one to two gallons of fresh water per day, about 1% of its volume — but the salt doesn't evaporate with it. It stays behind, dissolved in less and less water. The result: salinity creeps upward, day after day.
How fast depends on your tank: open-top tanks under strong light and cooling fans lose the most, while a tank with glass lids or a screen top can evaporate up to 10× less. Winter's dry indoor air roughly doubles the rate. The only number that matters is your own — run the tank for a week and measure.
Imagine a glass of salty lemonade left in the sun. The water evaporates, the salt doesn't, and the last sip is much saltier than the first. Your reef is that glass — and your corals are drinking from it every day.
Without an auto top-off, you are the top-off system. You're manually pouring RO/DI water into the sump every day or two. Miss a couple of days and salinity rises measurably. Go on vacation, and either your tank drifts toward trouble or a house-sitter is doing chemistry they don't understand.
An ATO ends that. A sensor watches the water level in your sump. When the level drops, a small pump pushes fresh water in from a reservoir until the level is back. That's the whole trick — and it runs 24/7 without you.
Salinity stays flat, corals stay happy, you stay sane. Dollar for dollar, it's arguably the second-highest-ROI equipment purchase you'll make, after a heater.
How ATO Sensors Work
Every ATO lives or dies by one question: how does it know where the water is? Three detection technologies do the sensing, and a fourth layer exists purely to catch the first three when they fail. The differences matter more than any other spec on the box.
Optical
The reef standardBounces infrared light off a prism tip. Water bends the light one way, air another. No moving parts, no drift, nothing to calibrate — which is why nearly every premium ATO uses it.
Float switch
The 30-year veteranA plastic disc floats up and down with the water, opening and closing a magnetic contact. Simple, cheap ($8–$15), and it powered the very first ATOs decades ago.
Conductivity (EC)
The app-connected optionA solid-state probe reads the water's electrical conductivity — contact means water, no contact means air. Long the industrial choice, it's now the primary sensor on app-connected units like the Red Sea ReefATO+.
Failsafe cutoffs
The safety netNot a level sensor — a second line of defense the good controllers layer on top. A max-runtime timer cuts the pump if it runs too long without the level clearing; a thermal probe (Tunze Osmolator 3) or a mechanical float (Neptune ATK) trips independently of the primary.
How the two big ones actually work
Optical sensors are like an electric eye at a shop door — nothing moves, it just sees. Float switches are like the ball valve in your toilet tank — great until something jams the arm. If you remember one thing: buy optical, and wipe it clean once a month.
Reservoir Sizing & the Safety Cap
The ATO refills your sump from a freshwater reservoir, and its size is a balance between two competing forces. Bigger means fewer refills. But bigger also means that if the ATO ever runs away, more fresh water dumps into your tank — flooding the floor and crashing salinity. The reservoir is your last line of defense, and its whole job is to be too small to do real damage.
That gives you the single most important sizing rule reef veterans repeat: keep the reservoir no larger than 15–20% of your total system water volume. Convenience wants a week of top-off between refills; safety caps how big you're allowed to chase that. Take the smaller of the two.
Bulk Reef Supply's field-tested tiers line up neatly with that cap — a good shortcut if you'd rather not do the math:
- 5-gallon reservoir → tanks up to ~75 gallons. The most common setup; refill weekly.
- 10-gallon reservoir → tanks up to ~120 gallons. The practical ceiling for most homes.
- 15-gallon reservoir → tanks 200 gallons and up.
- A tall, narrow container beats a wide, shallow one — a shallow reservoir lets the pump suck air and run dry before it's empty.
Big plumbed reservoirs (30+ gallons, auto-filled from RO/DI) do exist on serious show tanks — Melev's Reef runs a 45-gallon one — but only behind layers of float valves and redundant shutoffs. For everyone else, the small reservoir isn't a compromise; it's the safety feature.
One non-negotiable, whatever the size: fill it with RO/DI water only. Never tap, never softened, never bottled spring water — TDS should read zero on a meter. Any dissolved solids stay behind and accumulate exactly like salt. If you don't own an RO/DI unit yet, that's the next purchase — see the RODI water guide.
The Brands That Dominate
The ATO market has quietly consolidated around a handful of names. Prices below are current US retail at Bulk Reef Supply as of July 2026 — each owns a distinct niche:
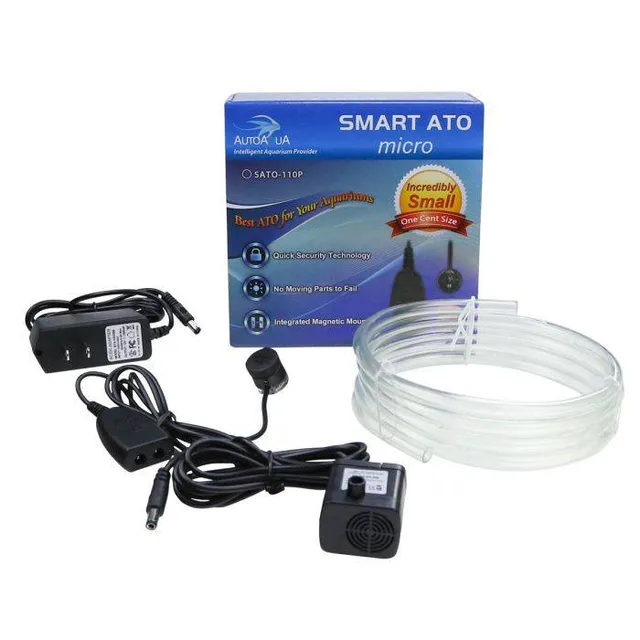
AutoAqua Smart ATO Micro / Lite
The best value in the hobby. The Micro (SATO-120P) pairs a primary optical sensor with a second optical backup plus internal safety cutoffs in a compact, wall-mountable box. The Lite is the cheaper sibling — one optical sensor plus a timer failsafe.
How it functions: the controller polls the optical sensor every few seconds. Level low → it powers the included DC pump. A max-runtime timer (and, on the Micro, the second sensor) cuts the pump and alarms if a fill ever runs long.
ReefBreeders Prism ATO
The budget standout. Three infrared optical sensors stacked in a single probe — fill, high-level backup, and low-level alarm — for less than most single-sensor units cost. A lot of redundancy per dollar.
How it functions: the middle sensor runs the fill; the top sensor is a hard cutoff if water climbs too high; the bottom sensor alarms when the reservoir runs dry, protecting the pump. All three live in one wand, so spacing is factory-set.
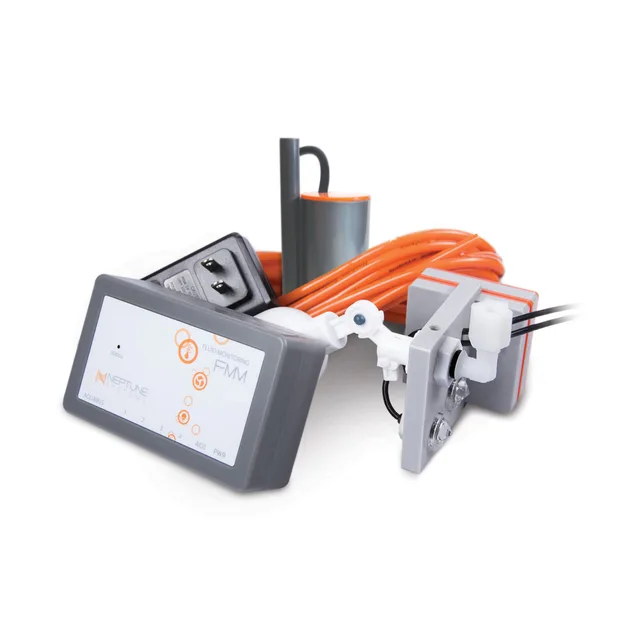
Neptune Systems ATK V2
The most redundant kit on the list — and, contrary to popular belief, it does not require an Apex. It ships with its own FMM module and runs on its own; an Apex is optional and only adds phone alerts and cloud logging.
How it functions: four layers of protection — a primary optical sensor, a second optical backup, an IQ-Fill runtime cap that learns your normal fill time, and a passive mechanical float valve as the last resort. If one layer misreads, three more are watching.
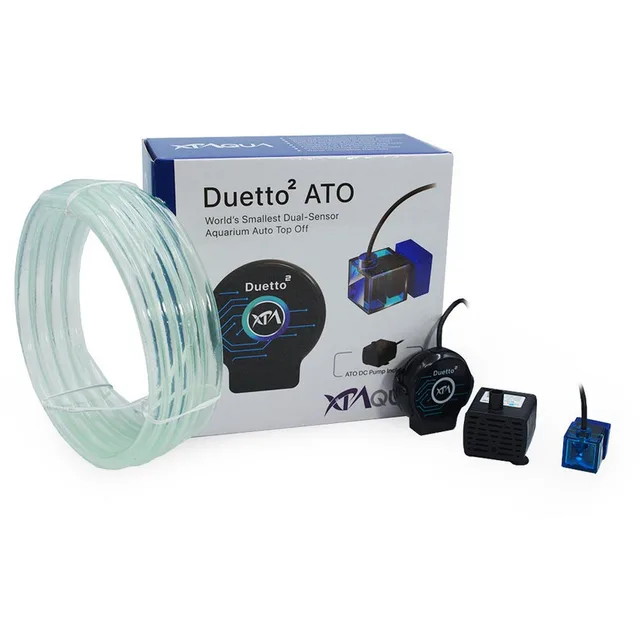
XP Aqua Duetto (Duetto 2)
A dual-optical ATO whose sensor housing mounts inside the sump for a very clean look. Reliable, mid-priced, and popular on rimless and bare-bottom builds where sensor visibility matters. The current generation is the Duetto 2 (DATO-202P), with tougher sensors.
How it functions: both optical sensors live in a single slim wand — primary at the bottom, backup at the top. The controller fills to the primary and treats the backup as a hard stop, so the fail-safe spacing is factory-set instead of something you eyeball.
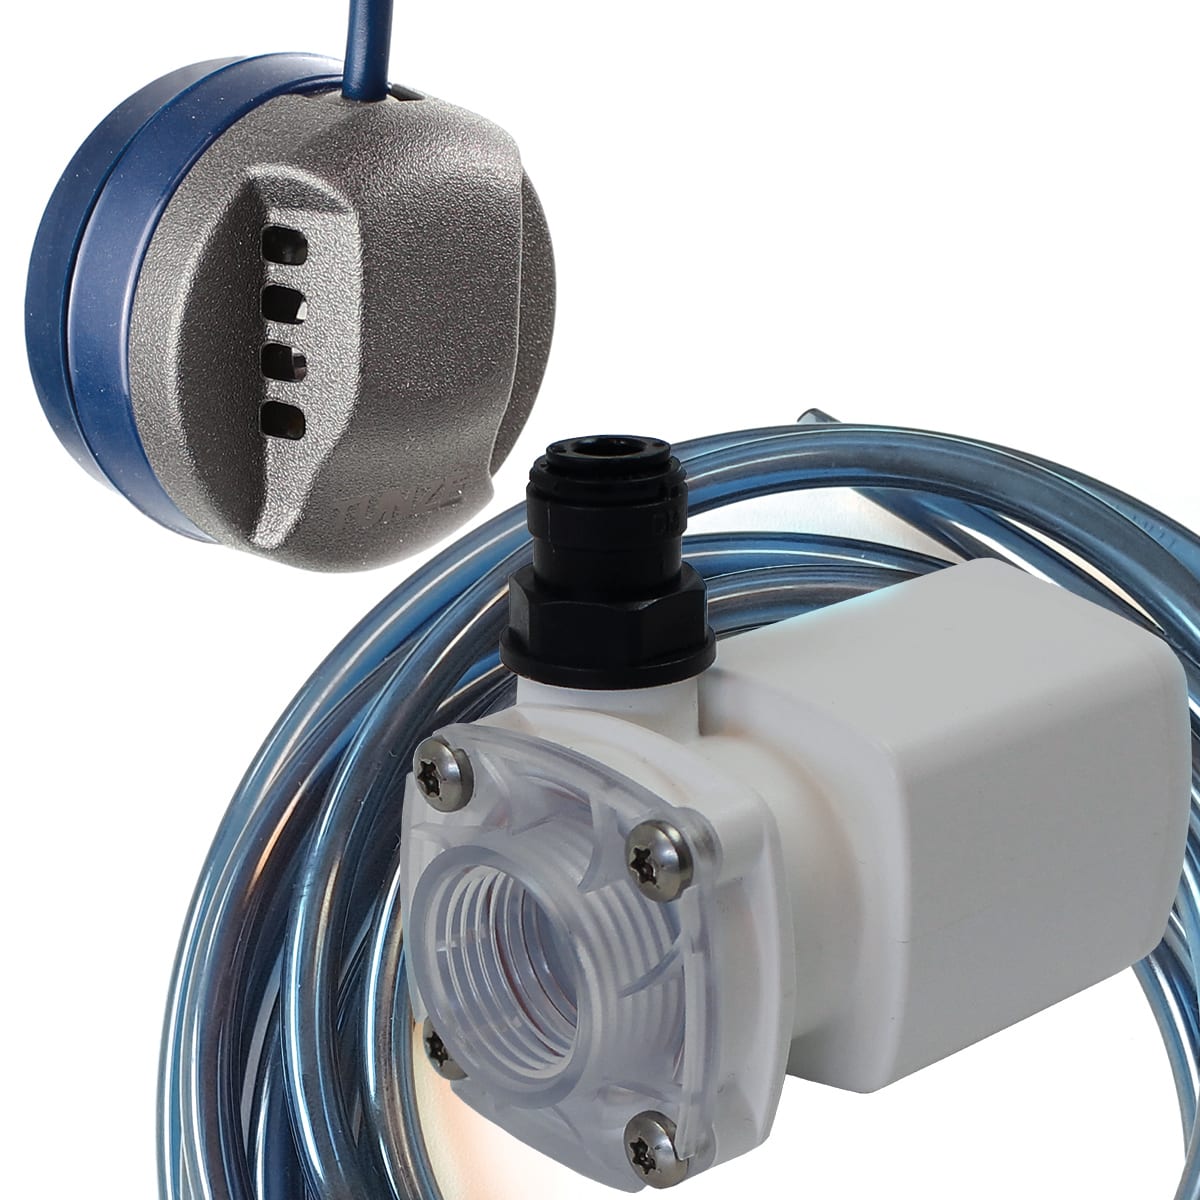
Tunze Osmolator (3155 & Osmolator 3)
The German engineering choice, with a reputation for 10+ year lifespans. The long-running 3155 pairs an optical sensor with a mechanical backup float and audible alarm; the newer Osmolator 3 line swaps the float for an independent thermal safety sensor.
How it functions: deliberately mixed technologies — an optical eye for everyday level control and a second, different failsafe (float or thermal) so no single failure mode can take out both. The controller times each fill and alarms if one runs long.
Comparison Table
| Model | Sensor tech | Backup? | Pump included? | Price (USD) |
|---|---|---|---|---|
| ReefBreeders Prism | Triple optical | ✓✓ 2 backups | ✓ | ~$80 |
| AutoAqua Smart ATO Micro | Dual optical | ✓ optical backup | ✓ | ~$108 |
| AutoAqua Smart ATO Lite | Optical + timer | Timer cutoff | ✓ | ~$55 |
| XP Aqua Duetto 2 | Dual optical | ✓ optical backup | ✓ | ~$102 |
| Tunze Osmolator 3 Nano | Optical + thermal | ✓ thermal cutoff | ✓ | ~$127 |
| Tunze Osmolator 3155 | Optical + float | ✓ float backup | ✓ | ~$195 |
| Neptune ATK V2 | Dual optical + float | ✓✓✓ 4-layer | ✓ | ~$280 |
| Red Sea ReefATO+ | Conductivity (EC) | ✓ + leak sensor | ✓ | ~$225 |
| JBJ ATO | Float switch | ✗ | ✓ | ~$70 |
| Simple float + pump DIY | Single float | ✗ | You supply | ~$25 |
Street prices at Bulk Reef Supply, July 2026; verify current pricing before buying.
Redundancy: Why You Need Two Sensors
Here's the uncomfortable truth about every single-sensor ATO: the sensor will eventually misread. Not might — will. Salt creep, coralline, a fouled float arm, a firmware hiccup. And when it does, one of two bad stories plays out:
- Stuck reading "empty": the pump never stops. Two disasters at once — the sump overflows onto the floor, and all that fresh RO/DI water dilutes the tank, so salinity crashes low. Documented cases have dropped tanks from 1.026 to 1.018 in hours.
- Stuck reading "full": the pump never runs. Evaporation keeps removing pure water, so salinity climbs — reaching stressful levels (above 1.028) in roughly 3–7 days and setting up bleaching or tissue loss.
The universal fix costs about $30: a second sensor mounted roughly one inch (25 mm) higher than the first. The primary runs the everyday refill cycle. The backup does exactly one job — if water ever rises past where it should be, it cuts pump power. It catches the "stuck empty" runaway before your floor does.
AutoAqua Smart ATO Micro, ReefBreeders Prism, XP Aqua Duetto, Neptune ATK, and Tunze Osmolator all ship this backup design out of the box. Cheap float-only units (JBJ ATO, DIY builds) do not — which is why they're not recommended for anything holding livestock worth more than $500.
Better than two sensors: two different sensors
Two optical sensors are good. But if the thing that kills your primary — say, a firmware glitch or a coating of coralline — is the kind of fault that could hit the backup too, both can fail together. That's why the safety gold standard is diversified redundancy: pair an optical sensor with a completely different technology, so no single cause can take out both. It's exactly why BRS has recommended the Tunze Osmolator for years, and why the Neptune ATK adds a mechanical float valve on top of its optical pair.
1. Primary sensor runs the fill. 2. A backup of a different type (float or thermal), mounted ~1 inch higher, cuts power if the level climbs too far. 3. A max-runtime timer — the most underrated feature of all — shuts the pump off if any single fill runs longer than it ever should, catching failures the sensors miss. And for about $10, a passive mechanical float valve in the fill line is a fourth layer that needs no electronics at all.
Setup & Calibration
The physical install usually takes about 15 minutes. Here's the complete layout you're building, with every step numbered:
Choose the sensor location
Use the sump's return chamber — the section after the skimmer and refugium. Water level there is stable; every other section fluctuates too much to trust.
Mount the primary sensor
Clip it at your target water level. Auto Aqua and XP Aqua sensors attach to the sump wall with an adjustable-height clamp.
Mount the backup sensor ~1 inch (25 mm) higher
High enough that normal refill cycling never touches it, low enough to catch a runaway well before the sump rim. If it's a different sensor type than the primary, even better. Keep it at least 4 inches from any float valve to avoid interference.
Connect the pump
Plug it into the ATO's own outlet — never straight into wall power. Drop the intake into the RO/DI reservoir.
Route the output line
End it just above the target water level in the sump. If it sits too deep, a stopped pump can keep siphoning — you want gravity to break the siphon.
Test before you trust
Lift the sensor by hand to confirm the pump kicks on; release it to confirm it kicks off. Only then walk away.
Calibration on optical-sensor ATOs is essentially zero. On float-only units, check that the switch sits horizontal (not tilted) and the arm swings freely.
Eight Common Mistakes
Every one of these has crashed a real tank. Read the list; skip the tuition.
Plumbing the ATO straight to your RO/DI line
The single most dangerous setup. A reservoir can only spill what it holds; a filter line is unlimited. A stuck sensor here doesn't just crash the tank — it floods the house until someone comes home. Feed a reservoir through a float valve instead, never the tank directly.
Forgetting to disable the ATO during a water change
Drain saltwater and the sump level drops — so the ATO "helpfully" tops it back up with fresh water, quietly crashing your salinity. It's a classic beginner salinity swing with nothing broken at all. Flip the ATO off before every water change and maintenance session.
Buying a single-sensor ATO
The $30 you save is the exact cost of removing your only safety net. This isn't the place to skimp.
Skipping leak detection
A $30 leak mat under the sump, wired to cut both the return pump and the ATO, is the ATO's own backup. See the reef controllers guide for wiring rules.
Never cleaning the optical sensor
Wipe the sensor tip with a cloth every 4 weeks. Salt creep and coralline build up faster than you'd think — and a blinded sensor stops refilling.
Tap water in the reservoir
Tap water feeds phosphate, nitrate, silicate, chlorine, and heavy metals straight into your reef. Nuisance algae blooms follow within weeks. RO/DI only, verified at 0 TDS.
Leaving the reservoir open
Keep it sealed (a Rubbermaid-style lid works). Open reservoirs collect dust, fungi, and algae over months — all of it destined for your sump.
Never testing the runaway scenario
Once installed, lift the primary sensor by hand and watch. The backup should cut the pump before water nears the sump rim. If it doesn't, lower the backup sensor and test again.
Our Picks by Tank Size
ReefBreeders Prism (~$80) or Tunze Osmolator 3 Nano (~$127)
The Prism gives you triple-optical redundancy for budget money; the Osmolator 3 Nano is one of the highest-rated nano ATOs made if you'd rather spend up. A 5-gallon jug of RO/DI lasts 1–2 weeks at nano evaporation rates.
AutoAqua Smart ATO Micro — ~$108 (or Neptune ATK for max safety)
The Micro is the default choice — dual-optical, cheap, reliable. Want the most redundancy, controller or not? The standalone ATK (~$280) layers four safety mechanisms and adds phone alerts if you later add an Apex.
Neptune ATK V2 (~$280)
Its four-layer redundancy earns its keep once there's serious livestock on the line. Add an Apex and you also get salinity/level logging and push alerts the moment anything drifts.
Neptune ATK V2 or Tunze Osmolator 3155 (~$195)
The ATK for dashboard integration and four-layer safety; the Tunze for physical build quality and its optical-plus-float mix. Show-tank builders occasionally run both in parallel, the second as a backup pump path.